
Export File Explorer Search Results to Excel or Other App.
How to export Windows File Explorer search results as a list of files in Excel, Outlook, Word, or Notepad. It is not apparent from File Explorer how you copy file names instead of copying the files themselves. I’ll show you a combination of two excellent tricks that get your files and list them in Excel. I use MS Excel mostly but you can past your search results into any App. It is easy enough so that almost anyone can do it so read on.
Introduction
Often we make a search in File Explorer, but how do you make it into a useful list to use in another application like Microsoft Excel? You can to select multiple files when you click-hold and drag the mouse over several files.
PROBLEM: When you try to copy, you get a copy of the files not the list of them. There doesn’t seem to be any handles on that list of nor obvious way to grab them so you can export it.
In this article l show you how to create a list of File Explorer Search results and paste in Excel. You don’t have to export to Excel; you can paste into Outlook, Notepad or Word.
You do not need programming or Excel macros when you use two tricks that make it easy.
Some of you may be wondering ‘How can I get a list of files in a folder?’ You can follow my steps below to do that easily without using command windows or special directory tree software.
Along the way, we answer the questions:
- How to save File Explorer Search Results as a List?
- How do I save Windows Explorer search results?
- How do I export search results to excel?
- Once I have the list, how do I copy file names into Excel? (I.e. file name only, not the entire file path.)
- And, ‘how do I save Explorer search results in Windows 10?’
Contents
To the point – In Brief: How to export search results to Excel
As highlighted, there are two tricks to do this.
To export File Explorer search results jump to trick 1 here.
To copy file names into Excel (i.e. extract the list of filenames only) jump straight to trick 2 here.
You need trick 1 and 2 (kind of two overall steps) to export search results to excel. I strongly encourage you to read some of the details around these as it can save you time or give you broader options, the in-page jumps below will get you to the essential tricks.
Which versions of Windows does it work for?
The steps below help you to export Explorer search results (or any directory listing) into Excel, Outlook or other application with Windows 7, Windows 8 and Windows 10. I am yet to test it on Windows 11, but I expect it will work on that also.
Similarly, you may be wondering how to print a listing of folders and sub-folders in a directory. The steps below will show you how once you create a view (or search) in File Explorer that will be the basis for that.
TIP: search for *.* in your desired folder to get all files (the star character acts like a wildcard representing any file name and any extension).
In Brief: How to Export search results to Excel
If you are an expert, you might not want to read my very detailed explanation of each step.
If that is you, here is the entire process to export search results to Excel in DOT POINTS:
- Conduct your search to get File Explorer Search Results.
- Select files and folders (or just one) in the search results.
- <Shift> + right click on selection.
- Click ‘Copy as Path’ from menu.
- Paste into Excel.
- Use my formula to easily trim the path from each item.
Jump to formula that completes exporting search results to Excel.
If you can’t follow that, here are the steps in detail so it is more clear!
Step 1 – Find The Files in Explorer
First create your search in Windows Explorer.
If you only need to get a list of files in a directory, well you probably already have that without a search! Just locate that directory in File Explorer.
Get File Explorer Search Results
You can open file explorer with the shortcut <Windows key> + <e> (windows and the letter ‘e’ key).
Then to search you use the entry box just below the ribbon on the right hand side (look for the tiny magnifying glass symbol).
Here is my example search results below, in which I searched for 999 (just visible top right).
Notice how there are several different folders and paths. My example is more than a simple directory list, and these steps work anyhow!

File Explorer Search Results list. How on earth do you copy a list of the results rather than copy the files themselves if you want to export them to Excel? It is not obvious, is it?!
Step 2 – Select a File or Folder
Next click on any file within the directory or search results so that you have selected something in the list.
TIP: If you sort your files now (for example in order by size, by clicking at the top of the header) then the list you create will be in that order. It might be handy to think of it at this stage.
Step 3 – Select All or a Group of Files
Now press <Ctrl> + <a> to select all files and folders.
(Just to be clear, that is press the control key and the letter ‘a’ key at the same time.)
Of course, if you choose you can select only the file or folders you want rather than all files and all folders. The following explains how to do that if you are not familiar with it.
To select some adjacent files, click the first, then hold <Shift> and click the last.
To select non-adjacent ones, hold <Ctrl> and click each one you want.
Yes, this can be time consuming, and yet it is quicker than editing and copying each file name (or typing them out) one at a time if you have more than two.
TIP: If you need most of the files in your directory view, it could be quicker and easier to make a list of them all and delete the few you do not want once you have the list in your other application.
Step 4 – Copy the Filenames and Paths of Search Results
Now here comes the essential trick (trick number 1):
Hold down the <Shift> key and while still pressing it then right-click on a selected file (any file will do if all are selected).
That is <Shift> + Right-Click.
Look down the pop-up menu options list to find “Copy as Path”. See below for an example.
This should be there if you have held down the shift key when you right clicked. See the image below for how it looks in Windows 10. Windows 7 and Windows 8 look a little different, but the shift right-click menu contains Copy as Path.
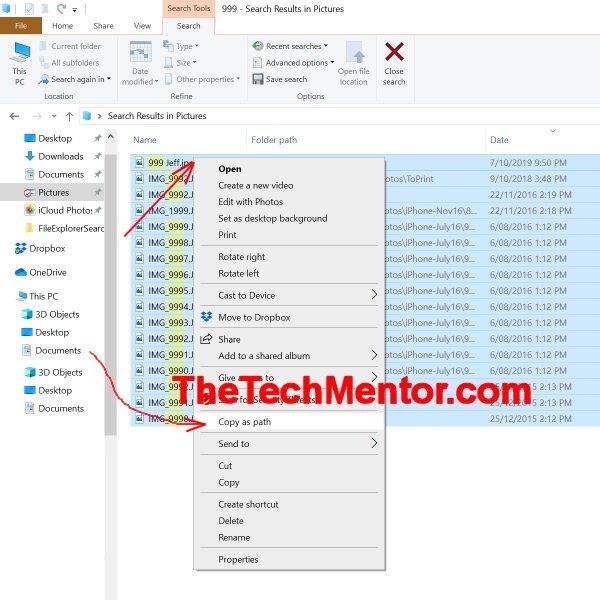
Trick Number 1 – Export the File Explorer Search Results to the clipboard by holding Shift and right click. Use ‘Copy as Path’ as highlighted.
This is the key step to export from your File Explorer search results to Excel, Word or other application.
If you do not see ‘Copy as Path’, check again if you still have <Shift> held down when you clicked the right mouse button on a selected or highlighted file.
TIP: If you did not have <Shift> still held down (it is easy to forget the first few times you do it after you learn the trick), simply hold shift and right-click on a selected file (away from the menu that already popped up) so that your file selection remains selected. That could save you having to select specific files again.
Go on, practice it a few times right now, with and without <Shift> held down to observe the different pop-up menus.
Now to be complete and help those with less experience, I will go into some useful detail below on where and how to paste. If you can not wait to see my Special Must-Have Trick number two, get your content on the clipboard first then click to jump straight to trick number two here.
Step 5 – Chose a Destination App
Go to another application into which you want to paste the information.
I prefer Excel, and as you will see it has some advantages, and if you don’t have or don’t want to use MS Office with MS Excel, you can use Word, notepad or your own chosen application.
If you want to email the list, you can paste it into Outlook also.
If you don’t have MS Office at all with MS Word, you can use Notepad.
Step 6 – Find a Clear Location to Avoid Overwriting Any Existing Data
You can use a countless number of Apps into which you can paste the File Explorer list as text.
Here’s how to use Excel.
Open a new sheet (optional really – you can just paste into a clear place in an existing one to avoid over-writing any existing data).
Step 7 – Avoid Releasing the Data From the Clipboard
Avoid moving or copying other data if you need to make space, so your Explorer results are still copied.
With the search results still on the clipboard (that is, in the computer memory) ready to paste, move your cursor or select a cell for the destination and follow the next step.
Note: If you did have to move or copy other data, just go back and repeat step 4.
Yes, I admit this is kind of a ‘what not to do‘ step. 
Step 8 – Paste your File data
Paste, using any way you like, into your chosen app.
Below we cover the example of using excel, since that has the useful ability to manipulate the file path with our special formula.
Copy File Names into Excel-Windows 10
Now you have the file names copied to the clip board, you put them into Excel (either existing or new file).
For example, you can right click on cell B1 (if in Excel) and select Paste from the menu.
You will note you get the full file path and filename of each file from explorer in a vertical list with one item per cell in subsequent rows.
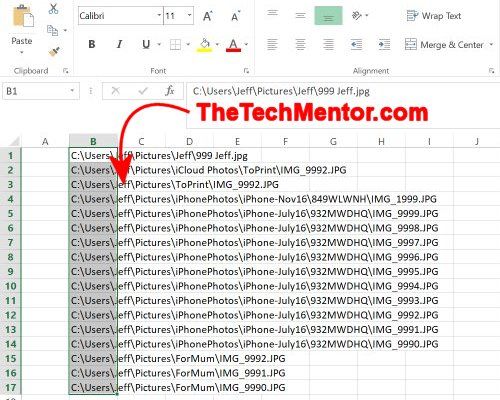
Save Windows Explorer search results from the clip board into Excel. Notice the file path as well as the file name is included for each item from explorer.
Step 9 – Special Case: Paste Into a Hyperlink (Optional)
You can paste these as a list into Word, or Outlook. You can also paste into a link that will work for those who read your document or email. I go into some detail for this optional step below, so if you just want to see the special Excel trick jump to that here.
If you have a single file path and file name, you can create a hyperlink in Word or Outlook, then paste the address in the address bar. Do this as follows.
Start a hyperlink (Optional)
In Word, click ‘Insert’ on the ribbon menu bar, then ‘Hyperlink’ (often displayed with an icon that looks like two chain links or that plus a mesh globe).
Alternatively you can right click, then select ‘Hyperlink’ from the pop-up menu.
The ‘Insert Hyperlink’ window will open with the cursor ready at the address entry location. Right click and select ‘Paste’ or press <Crtl>+<v>.

Paste a single file path here from your results if you want to create a hyperlink in Word or in an email. You can write your own short text to display where you see TheTechMentor.com.
In some cases you will want to get only the file names from the Explorer search to Excel, not the entire file path.
To remove the file path you can do several things.
My trick below is the absolute best way to get it, but first here are some other ideas.
You can simply manually delete the preceding text to the left of and including the last backslash. This is reasonable if there are not many to do.
You can try to use text to columns in Excel (but this doesn’t work nicely with a mix of lengths or rather depths of file paths. The final filenames could be scattered in many different columns. It is more of a pain than a help.
The trick below is better and works for any length or mix anyway.
As I wrote above, I prefer Excel, and this is one reason why.
If you have a long list with multiple sub-folders of different lengths you will need my super formula trick! (Trick number 2!)
Step 10 – Formula completes export of search results to Excel
In this part of the export to Excel, paste the search results to Excel now. I suggest start at Cell B1.
Select my formula below, copy and paste into Excel, I suggest to Cell A1. It’s only a suggestion so your final list of search results starts at the first cell in the spreadsheet.
This formula is trick number two and is essential if you have a long list and want the file names only.
To use my formula without any editing, you will need to have pasted your Explorer search results path into cell B1, or otherwise you will have to edit my formula. If you are used to Excel this should be pretty easy.
I mean, it will be easy if you have a basic understanding with Excel formula cell references.
Export search results to Excel but only keep the file names
In most cases you want to export search results to Excel and to most of us your search results look like only a selection of files and folders (or icons). They don’t contain the entire file path in addition to the names. So for your final list in Excel to look like your search results, you need to trim down each result to just the last part of the path.
You do not need to know much about formulas or understand this one in particular. Just paste it (preferred) or type it in (less preferred in case you mistype it).
The formula to paste into Cell A1 is:
=TRIM(RIGHT(SUBSTITUTE(B1, “\”, REPT(” “, 99)),99))
NOTE 1: If you do not want to type out the formula, you can download this simple excel spreadsheet with example formulae already written for you. You can then just copy and paste into your spreadsheet.
NOTE 2: If your quotation marks appear a little like 66 and 99 you will need to delete them in Excel and retype them, so they are the simple vertical quotation mark type as recognized by Excel. In any case, if you get an error you might need to type it manually from scratch!
Sorry, some quotation marks look the same but act differently in an Excel formula.
This formula works with long file names in your search results.
See the image below for an example.
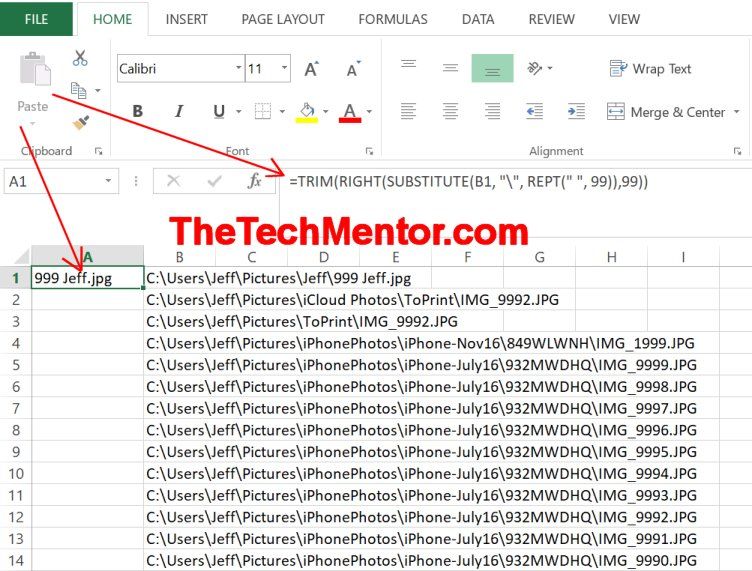
Awesome trick number 2! Convert your File Explorer Search Results list into a truncated list of files only with my formula. Note the different folder paths and lengths. This formula works with different file name and path lengths, as you will see!
Naturally, if you are familiar with Excel, you can paste this formula anywhere you want. You only need to change a single reference, so it easy.
If you need to, for example if you pasted somewhere else, you can change the cell reference “B1” to wherever the cell is with your first pasted file path and file name.
The rest of the formula works independent of location.
Step 11 – Copy the formula and paste for each File path and name in the list
You can just copy down until you have all cells with your search results converted.
I’ll explain a few ways so anyone can do it. For now see below the results. All file names are shown independent of file path length!
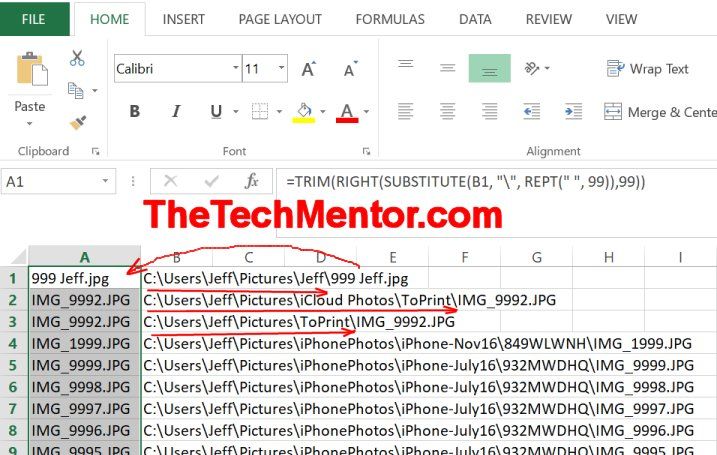
Copy down the formula. Notice how the file name is created as a list, independent of the length of file path. This trick alone makes transferring any file list from explorer very easy!
If you don’t need help pasting the formulae, you can click to jump straight to how it works here.
One way to do this is select the first cell with my formula and double click when you hover the mouse over the bottom right hand corner of the cell.
To be clear (for those who do not do this often), watch the mouse icon for it to change to cross-hairs.
When that visual signal indicates your mouse is sufficiently over the corner of the cell with my formula, double click. This should fill down as far as Excel recognizes the list of file names and paths from your Explorer search.
Alternatively you can click and drag when the cross-hairs show you are in that bottom right corner position of the cell.
Fill down <Ctrl>+<d>
Alternatively you can highlight from the first cell (with the formula) down to the end of your list.
Then hold <Ctrl> and press <d>. This is the short cut for ‘fill down’ or copy down (‘d’ being for down, not surprisingly!).
There are other ways you can copy and paste your formula down too. Use the method that works for you.
Once you have converted your Explorer file results into Excel, you can copy and paste into any other app like MS Word or Outlook or whatever you need.
Formula alternative
If you have very long file names, you might want to use the following variation after pasting your list into MS Excel.
=TRIM(RIGHT(SUBSTITUTE(B1, “\”, REPT(” “, 250)),250))
NOTE: If your quotation marks appear a little like 66 and 99 you will need to delete them in Excel and retype them, so they are the simple quotation mark type as recognized by Excel.
Again, you can change B1 to your desired cell reference.
These formulae are original for this application, so you will not find them anywhere other than right here on TheTechMentor.com!
[Feel free to spread the word, so long as you put a valid reference (do follow link) back to this article – Editor]
Translating from another language?
If you are translating this article from another language, most of the explanations will be clear. However the formula itself will not work in an Excel version other than English Excel.
For example, the Trim() function in French is called SUPPRESPACE().
A helpful site which can translate the above formula into your language is the Excel Translator.
Okay, so I promised to explain how it gets the file name only for the list.
How does it work?
It might surprise you that it does work using a formula only, and no macro program. It really makes this method more user-friendly because it works without code.
Well for those of you who are amazed that such a short function can cut the file path to leave only the file name, it is a clever trick and here is how it works.
Substitute
The ‘substitute’ function places spaces anywhere in the path that has a directory separator (that is, the backslash ‘\’) with many space characters.
Repeat the space…
Excel generates these spaces by the repeat or ‘REPT’ function (there are a large number of spaces generated this way).
Trim like a Ninja!
The ‘Trim’ function removes all of the unwanted spaces starting from the right hand end of the string (and you guessed it, the ‘right’ function helps make that possible from the right side) leaving none of the unwanted file path from wherever it starts in the string.
Note: You can see that the trim() function name is nice and short, but the French version (I named above) is literally ‘delete space’, and hence it is more obvious what is does.
It cuts the right hand side to about the same number of characters as spaces. This means the filename remains and a similar number of spaces (to the file name length) get cut from the last ‘bunch’ of spaces.
Brilliant solution? Perhaps.
This great formula trick is brilliant because it achieves the goal and is quite short. To me it is not so much elegant as industrial.
We blast in bulk spaces then remove the spaces from (the same number from) the right to leave only the file name. Brilliant!
So, that is the second trick required to get your list of directory or search results in File Explorer and copy into Excel or other app.
Background
Every so often when I’m in a new big firm, I search, find and compile an index of the most useful files.
When supporting a large company, I find this is necessary as they have useful documents spread in many different locations (often for their own good reason, don’t get me wrong). I like to create a register of where these files are, their file name, and a link back to them so I can easily find just the ones I need.
How do I save Windows Explorer search results as a list?
I used to find the files I need by using Explorer to search the company drives.
There isn’t an obvious way to save just the results in a convenient form, so the question “How do I save Windows Explorer search results as a list?” always used to come up.
I note you can save the Explorer search as ‘a search‘, but that is literally used to get back your search. It might have some use, for some, whereas my method lets you copy your File Explorer search list of files into any app.
DOS Old Days (just for background reading – you can skip this!)
In the old days we could start an MS DOS window.
These days you can use a Command prompt window with computer text instructions. To get it, just type the letters cmd into the Windows search bar. Alternatively, you can use PowerShell from the File menu within File Explorer.

Type cmd (for command) to get the command prompt window up. If this is annoying or scares you, then you will be glad you do not need it!
However, that is not for everyone, requires a certain level of tech skill! Besides, you can’t replicate the equivalent search easily, and my method above is much quicker.
Even techs will prefer my method.
TIP: Commit to following it a few times (make a Bookmark or Favorite to this page to find it again) and you will soon add it to your commonly used tricks to quickly get your list.
Nothing out there online ever seemed to cover everything I wanted to do, and before I worked out how to do it, it always seemed impossible. Not anymore!
Multi-use!
I do use it now for several different purposes.
For example if I am editing a list of Word documents in several project file which have many other document types, I can quickly create a checklist of all the files by doing a search of the relevant directories and pasting the list into excel.
It works equally well to generate a list of files containing certain letters or characters, like a common project number.
This Works on All Recent Versions of Microsoft Windows
Since I have been using it for some time, and now that I know how, I put it all together for you here.
- I use it in Windows 10.
- I have shown people how to use it within Windows 7.
- I’ve tested it works in a system with Windows 8.
- It should work with Windows 11, but I haven’t yet tested it – so do leave a comment if you try this.
No Directory Listing Software required
Another great thing about this method is you do not need special directory listing software!
Your purpose may be different, but it certainly is a useful way to get just what you need!
If you find it handy there is a good chance others will too, so be sure to share this post (via a link) with friends or colleagues whom it might help.
Any hey, if you have your own website, don’t just copy the tricks. Please give your readers a proper reference (a ‘follow’ link) to my page for all the details!
How do I save Explorer search results in Windows 10?
There are three methods you might want to apply.
- You can save the Explorer search results as a ‘Saved Search’ as described above. That saves the search, not the results, for when you want to repeat the search later.
- Or you copy the file names and paths in Windows File Explorer (and My Computer) using Trick 1 in Step 4 above.
- You could use command line code, but there are also other requirements when it comes to extracting your search results, so that is only for experts. We won’t cover that here.
Once you have the results on the clipboard, you can save them into any Windows application including Outlook if you want to share by email.
Summary of how to save Windows Explorer Search Results in Excel or other Application
This article explains in detailed steps an easy way to get a list of files in a directory or folder. It can do more than that! With my two tricks this method is the best way to export File Explorer search results into Excel to create a directory index or list. Some FAQs follow below.
Most of us don’t want to use Command Prompt or programming commands. You can select the search results, then hold down shift and right-click and ‘Copy as Path’. In Excel you don’t need to use macro programming either. A unique formula can trim it automatically.
If you only want the list, yes you can do it without complicated programming, software or command line script. Select your Explorer results and use the Shift right-click menu. Then a unique Excel formula can automatically trim to the names only if you have many results.
Select your results, hold down shift and right-click. Select Copy as path. Paste in Excel then copy and paste the formula that trims the results to only a list of names. This is helpful when you have too many results to edit manually.

Latest Comments