How to Clean an iPhone cable and port to fix intermittent charging problems!
If your iPhone won’t charge or suffers intermittent charging due to the cable or charger port not working, this article shows how to clean the key parts. Very often, you will need to clean the lightning charging cable pins and iPhone port. This is certainly the case when the cable has dark marks on the lightning connector pins. Don’t rush to replace your cable just yet! At TheTechMentor.com, we love to save you money if we can!
I’ll show some good and safe ways to clean the iPhone charger cord and connector pins.
I’ll also point out what to avoid when cleaning the lightning cable pins.
NOTE: Please note that to clean the iPhone cable lightning connector is only half the solution. I’ll explain the other thing you must do to be sure to fix your phone’s charging problem. Read on!
Contents
(Click to jump to that section of this article)
Symptoms – iPhone charger connects and disconnects
iPhone charger connection problems
How to clean lightning connector
Clean lightning cable with dark mark on pin 4
Clean lightning cable with dark mark on pin 5
The other half of the solution – clean iPhone Port
Background – My intermittent charging problem
Results of cleaning the iPhone cable and port
Introduction – Clean iPhone cable to fix intermittent charging
If you have an iPhone cable that is difficult to charge with, you can fix it in many cases.
Why does my iPhone lightning cable have dark marks on the pins?
This is due to dirt and lint. You can clean it with the right things as explained below.
It works especially well for cables that have a dark or black mark on pin 5 (or 4 counting from the other direction).
iPhone intermittent charging due to a dirty USB can be fixed by cleaning the USB cable first of all.
Often your iPhone’s intermittent charging is due to a poor power connection, which has a black spot on the connector pins.
This is especially for the case on the pin that is responsible for the power supply – only one pin on the lightning cable connector provides the power. Other pins provide data transfer, for example.
Symptoms – Your iPhone charger connects and disconnects
The typical symptom is that your iPhone charger connects and disconnects. You probably find as I did that at some point in time, you push the cable in harder and it seems to restart charging.
It can be annoying that the charger seems to connect to charge, but then disconnects if you bump the cable and even can disconnect all on its own!
If you use or borrow another cable and charge, and find that it works at first but then it also starts to work only intermittently, then you might worry that the problem is within your iPhone rather than more than one cable.
However, don’t worry yet. This can be explained, and cleaning everything as per this article will help in most cases.
Originally, I was worried that there might be a problem with my iPhone itself. “What if the charger port is the problem and I have to replace the whole phone?!” I fretted.
Well, I solved the problem without that and let’s hope you can too, by cleaning as shown below.
NOTE: If you really only want to see how to clean an iPhone charger cord not the lightning connector, just use soap and water and some cotton to rub through your fingers. If that is not enough due to being quite heavy oil or grease, then use the buffer mixture I explain further below.
iPhone charger connection problems
Your iPhone charger connection problems all come down to a break in the charging circuit somewhere from your Mac, PC or wall socket, through the charger block, charger cable, iPhone lightning port, to the battery within your iPhone.
This breakdown in the charger circuit can be in the charger itself, a broken wire or damaged protective sheath in the cable, soot or dirt on the lightning connector, and lint and dirt in the iPhone connector port.
Let’s hope we can exclude a break in the circuit within the iPhone itself. Although this might worry you, it probably is not that.
The charger block is also very sturdy, and quite solid inside, so it is least likely to be that unless it looks damaged from the outside. They are relatively easy to replace compared to your iPhone.
By far the greatest issue will be the charger cable and within the phone’s charger port (not the wiring or circuit inside the phone.
We will address the cable first then the phone charger port.
Charger cable wiring breaks and damaged protective sheath are visible externally.
In some cases there might be an internal break but in that case, we must pursue the other options below to test them out before we can decide it is something that we can’t see. In that case a new cable will be the way to go.
That leaves the first action you can actually do to remedy intermittent charging is to clean the iPhone cable, ie. clean the lightning connector, especially the pins.
How to clean lightning connector
As indicated, the charger cable lightning connector is marked. This can be dirt and grime all over the connector or a dark mark on pin 4 or pin 5.
You will need most of the following:
- Water
- Soap
- Sodium bicarbonate
- White vinegar and/or
- Lemon juice
- Cotton bud or Q-tip (or sponge).
- Tooth pick
Clean lightning cable with dark mark on pin 4
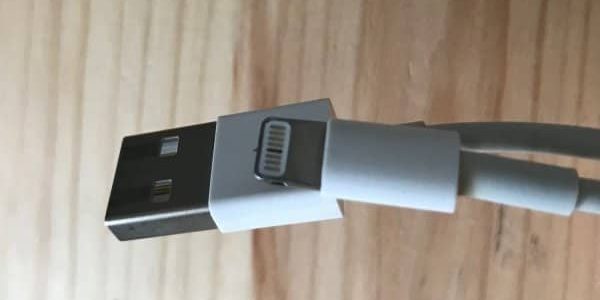
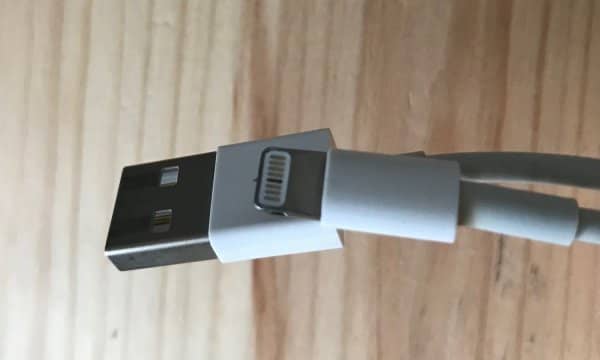
The lightning connector (the charger cable connection at the iPhone end) has several tiny gold or metallic lines inside a plastic and metal housing.
These are the connector pins and are (or can be) connected to a different wire within the cable. The literally touch corresponding pins within the iPhone port.
Each pin connects a circuit and each circuit has a specific function that doesn’t change.
The specification of each pin can be seen in a pinout (beyond scope of this article).
The important point is the same pin always gets the dark mark, because that is the most powerful circuit – the charging circuit.
If you count holding the cable away from you that looks like pin 4 from the left.
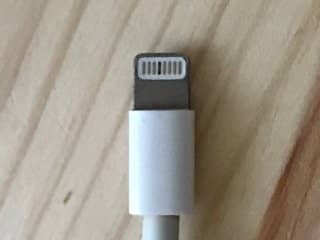
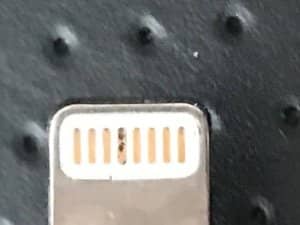
It appears this lightning cable has a dark mark on the power circuit pin 4, the 4th from the left, when the cable is held this way up. We’re going to clean it to stop or reduce our intermittent charging problem!
To be technically correct, we count the pins from the left when looking from beyond the end of the cable or looking back onto the connector (i.e. the other side).
This means to clean the lightning cable with dark marks especially on what might might seem pin 4 is actually pin 5. Which we cover now that we have explained a little about the pinout of the lightning cable.
For more information on the iPhone lightning connector and pinout see this article on wikipedia.
Clean lightning cable with dark mark on pin 5
If you jumped straight to this section, you might have skipped that pin 5 connects the circuit that carries the charging power to your iPhone.
That is the most powerful circuit and so if there is lint, dust oil or dirt on the connector or inside your iPhone charging port, it can not only interfere with charging. It can get burnt on like soot as the power arcs (or sparks) as the charger connects and disconnects, leaving the dark mark.
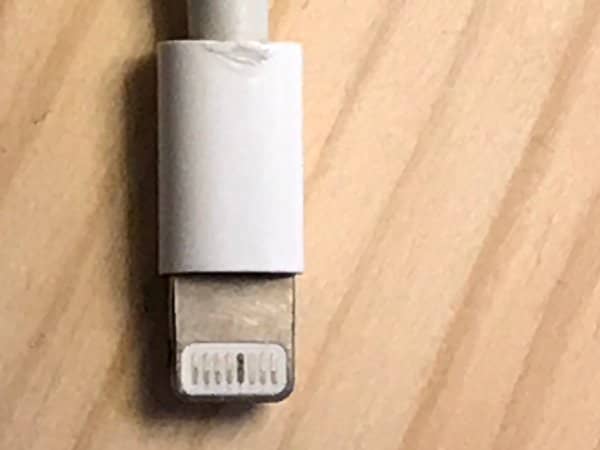
This is the correct orientation to see the dark mark is on pin 5 of the lightning connector. The soot is burnt onto the 5th pin when counting from the left due to sparks when the iPhone charger connects and disconnects. Yes there is some cable connector damage too. Read on to see how to clean your lightning cable that looks like this!
That is the key points to note are:
- Firstly, it can act as a resistance to charging.
- Secondly, arcing can burnt it on (i.e. tiny sparks as it connects and disconnects).
That makes it a bit like burnt-on soot. This is what can darken the pin from the normal shiny gold or metallic color.
If this is your case, then good news – we can fix the problem with cleaning.
As stated, it’s because this can cause the problem of your iPhone charger connecting then disconnecting.
You want to clean and remove this dirt or soot that appears as dark marks on the lightning connector pins and interferes with the power circuit for charging.
Step 1 – clean grease or oils
First clean with mild soap and water to remove residual grease or oils from your hands.
Get a sponge or cotton bud (Q-tip) and dip in a little warm water with a dash of soap.
Dish washing detergent or hand soap is fine.
Rub the end of the lightning connector, on both sides.
Step 2 – clean the harder deposits
To clean the soot or harder carbon deposits burnt on by arcing (or sparking) cooked-on as the charger connects and then disconnects, we need something stronger than soap.
Make up a small amount of cleaning liquid. This is water is ideally a little warm, but it is okay if you only have cold water handy. Half a cup of water is more than enough.
Add in a teaspoon of bicarbonate powder. Sodium bicarbonate is one of the many names this stuff goes by.
NOTE: This is not to provide grit for harsh cleaning, as some mistakenly think.
Stir if necessary to make sure it dissolves. When bicarbonate dissolves in water it creates an alkaline solution. If you really don’t have it you can try without.
Now it may seem counter productive, but we also need to add a gentle acid. Are you worried to have a reaction? Don’t be. The two together form a buffered solution that will help clean your device.
For that, now add white vinegar or lemon juice (if you don’t have any vinegar). You can use both if you have them.
These are naturally not strong acids. They wont be active enough to harm your cable or the pins.
Now dip in another cotton-bud or Q-tip (or even dish sponge if that is all you have).
Scrub the end of the lightning connector to clean it.
Simply wiping will not be effective.
Be prepared to rub and scrub for a few minutes, stopping to check progress as you go.
Helpful notes
NOTE 1: Now with these gentle cleaning products you will not likely damage the gold plating on the connector. But do keep looking at the surface to monitor as you go, just in case you see any deterioration in the connector coating itself (and stop if you do).
NOTE 2: The amount of force you need is quite strong, but be careful to hold on the hard part of the connector. Avoid bending and flexing the wire into the solid part of the lightning connector too much while you scrub. Excessive and continuing bending is what can cause the cable sheath or wires within it to fatigue and eventually break where they join into the card connector casing.
You can keep going until the mark is noticeably reduced.
You do not really have to remove all trace of soot. That would be nice but not necessary. Aim to get at least half off.
After you have had enough, then do a rinse and leave to dry. To rinse, just use another cotton wipe with clean water, that will do. Do not put under running water, just in case there is a slight leak in the cable connector housing!
Now what?
Finished?
Great! Now you have done HALF the job.
Yes that is right, only half.
AS you know the connector joins two things together. So far you have only cleaned one side of the connection, on the lightning cable.
To stop the iPhone charging problems which make your charger connect and disconnect, you must also clean inside the iPhone charge port.
You may well ask “how to clean the lightning port on an iPhone?” Read on!
How to clean a Lightning port
I go into to detail below so you get the idea if you have no idea how to do it.
You can skim read to get the main idea if that is all you need.
iPhone charging port cleaner
This iPhone charging port cleaner is made of the following tools and home materials.
- Tooth pick
- Cotton bud or Q-tip (or sponge).
- Water
- Soap
- Sodium bicarbonate
- White vinegar and/or
- Lemon juice
- Cotton bud or Q-tip (or sponge).

Some of the things we need to make our iPhone charging port cleaner. You don’t need much water.
You might be able to get by without some of these. Follow the instructions below and if you don’t have something you can just try similar or leave out one ingredient when you are cleaning the iPhone charger port.
Step 1: Turn off your iPhone
Make sure you turn off your iPhone. We will be making the connectors inside a little wet at some point and you do not want to do that while you phone is on, just in case.
Why?
Well, there is a control chip (or control within a chip) in most iPhone compatible chargers that directs power to the correct pin(s), similarly for data.
Inside the iPhone there is the corresponding action for the power to only go through the required pin.
In any case you do not want to take a chance to cause a short circuit or a power spike in your charging or data circuits due to it being wet, even if that is only remotely possible.
Otherwise – and in the worst case – you could damage your iPhone and need professional repair or replacement! Think new phone.
Expensive right? Cleaning with the phone off is much, much cheaper!
Step 2 – Remove bulk lint and dirt to clean the iPhone USB port.
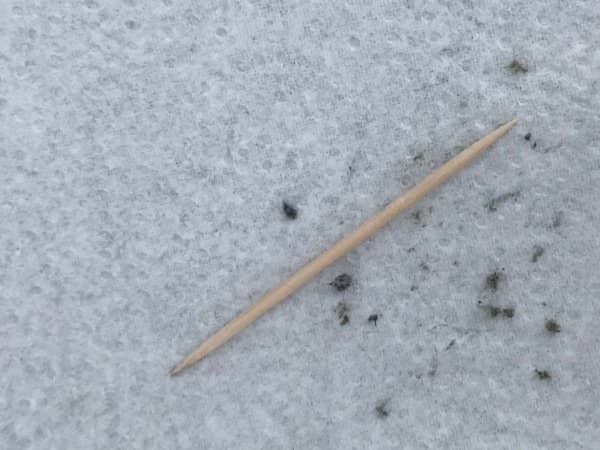
Use something small and relatively soft. A wooden toothpick is ideal.
Gently poke inside one edge of the iPhone charger port, drag along, then scoop out the other end.
It might sound like I’m digging a grave here, but of course the iPhone charger port is very small.
Small, careful movements are what you need to clean the USB port on the iPhone.
Be sure to work right up into and along the sides of the port inside your phone. Always try to scoop out at the end of your stroke.
Then work from the other direction, from one corner to the other and so on.
You might be surprised how much lint and debris comes out.
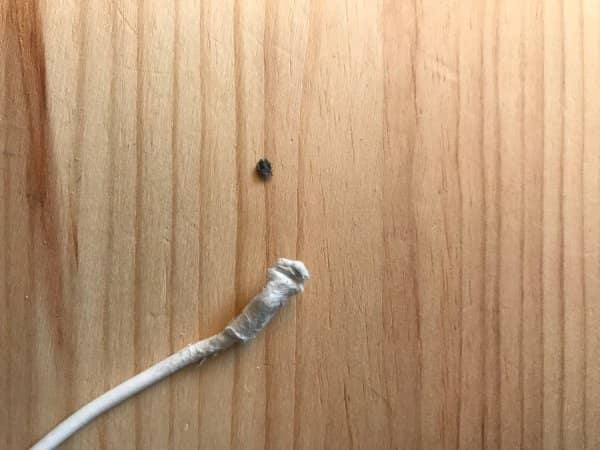
This shows the lint from cleaning the lightning port of an iPhone a few years old, and the toothpick used for the first part of the clean.
Step 3 – Clean soot off the pins inside the iPhone port
The iPhone port is too small for a standard Q-tip or cotton bud. You can try to crush the end of one with a pair of pliers, or just your teeth (! but be careful!).
I used pliers, but the stem still wasn’t really thin enough. The top of the cotton bud was thin enough, however.
You can see the top of the cotton bud or Q-tip was thin enough to get into the lightning port to clean it. Also one big chunk of lint came out. Notice the stem shows that quite some force was used while rubbing.
Otherwise, you can wrap some of the cotton around another wooden tooth pick.
Use your bicarbonate and vinegar (and/or lemon juice) mixture in water from above.
Dip in the cotton and move it along back and forth within the iPhone port (remember to ensure it is turned off first!).
Inspect the cotton every so often. Switch ends or use another piece of cotton, and wipe again.
You can wipe with water only as a little rinse step.
Learn from cleaning the marked lightning connector
Having tried to clean the cable using the above steps, you will have seen how hard it can be to remove burnt-on soot. Think of this while you are cleaning inside the iPhone lightning port.
NOTE: Again, you need some force, but don’t use too much force! You want to clean your iPhone USB port, not damage it or loosen internal connections!
Step 4 – Allow to dry
Leave the charger cable connector and iPhone port to dry for a few minutes.
Now you can either charge your iPhone first then turn it on, or vice versa.
I preferred to turn on my iPhone after cleaning so I could see the charging indicator straight away. This way you can watch to see if the charger connects and then disconnects or keeps charging continuously.
Monitor the performance of your iPhone charger for the next few days.
NOTE: Don’t be afraid to repeat cleaning your iPhone port and/or charger cable again.
If cleaning isn’t successful, then there might be a problem within your cable or cables, or the chip inside that directs the right data and power through the right circuit.
A break in the internal wiring or insulation that you can’t see might be the hidden cause. If that is the case for you, sorry it is time to get a new cable.
Intermittent charging of your iPhone can be caused by a damaged lightning cable. This lightning cable intermittent charging was fixed after cleaning. That was a surprise and it continues to work even though the outer sheath is damaged where it flexes the most. I wouldn’t rely on a cable like this to last long!
If brand a new cable and charger doesn’t work, then you really might have the more expensive problem of damage inside the phone.
Background – My iPhone Intermittent Charging Problem
I started to notice my iPhone intermittent charging problem after several years of use. My lightning cable would connect and then disconnect.
I tried a few cables over time, putting aside the original one that would charge intermittently. After a while, had more than one cable that would not charge my iPhone.
I started to notice that the lightning connector pins had a dark mark.
In fact I was worried there might be a problem with my iPhone charging port. There was, but it turned out to not be as serious as I thought. Given the nature of the problem, I though many people must have the same problem.
My problem was that when I pushed the cable in, the lightning connector would momentarily connect but then not charge. It would connect then disconnect.
It was as if the iPhone lightning socket was loose or not connecting. That was not really the case (although perhaps the lint and dirt inside wasn’t allowing the cable connector to fully enter the port).
I could push the cable in, it would charge briefly then stop charging. One night I put my phone to charge and it beeped to announce the connection, but in the morning, I found it had not charged at all! Stress!
This went on for a little while. Frustration!
This was early on, so I started to pay attention to plugging the lightning cable into my phone much more carefully from then on.
My iPhone is essentially waterproof. So that means I use it without much care for cleaning because I think nothing can get inside it if it is sealed so well that water can’t get in.
Not into the electronics, that is. But I hadn’t considered the port itself.
The iPhone lightning port can trap dirt and need cleaning.
However the lightning connector port is a small pocket that collects lint and oils from your sin and other dirt and debris. The cleanliness of the charging port is an issue especially when you start to notice dark marks on the lightning cable pins.
The dirt, oils or lint between the connector pins may get baked with the tiny spark that occurs when your charger connects and then disconnects.
You probably wouldn’t think to look inside the phone port and it is very difficult to do so anyway.
Over time is this soot gets baked on, but at least it makes the problem visible as the charger cable gets marks on pin 5 (or pin 4 if you count from the other end).
These dark marks on the pins are burnt on soot, from arcing (sparking) each time the iPhone connects and disconnects, that you need to clean both parts of the connections to resolve the problem.
I also had noticed that other cables that initially were okay, also started to have an intermittent charging problem, and also required cleaning.
Then I realized that I had to clean the iPhone charging port as well.
Avoid arcing (or sparking) inside the iPhone port
it is very difficult to see inside the iPhone port to see how clean you have made it. Cleaning your cable will have shown that if there is burnt on soot, it is not very easy to clean.
Cleaning burnt-on soot inside the port is not as simple as scraping out some lint!
The other thing worth noting, is I always try to disconnect at the USB end first – whether that be to a Mac computer or PC or USB connection at the wall power supply charger.
Yes, sometimes it is not as easy as just pulling the lightning connector out of the iPhone port, but it makes sure there is no chance of further arcing and soot buildup each start charging and disconnecting.
I decided to do this because if I can avoid further arcing inside then I will to ensure a long life for my iPhone.
Results of cleaning the iPhone cable or Charger Cord
I first only cleaned the cable lightning connector and the intermittent charging was fixed right away, and continued working for more than half the time.
See the photo below for the result of cleaning the lightning connector charger cord.
This view shows there was still some dark marks on the lightning connector charger pin after cleaning. I removed half the soot or more. What remains is much more faint than at first. Could have scrubbed for longer, I suppose! I found after the clean to this state it worked fine. Any intermittent charging after this I put down to being the need to clean the iPhone charging port. Everything was fixed after I cleaned that.
Other charging cables I also used experienced some discoloration over time also, on the pins and so they needed cleaning as well. Other Apple devices had been fine with those cables.
This made me realize that iPhone port was the common factor and it must have been ‘contaminating’ the other cables. I had to clean that as well. This was reinforced when I saw how much lint had come out of the iPhone port. No wonder it had seemed unstable at times.
After I also cleaned the iPhone lightning port properly, I have never looked back!
My iPhone charges perfectly every time now.
At thetechmentor.com, we pride ourselves on original perspectives and fixes on tech devices like iPhones. For example, did you know you can delete to the right on an iPhone using only the keyboard?!
Summary of How to Clean an Lightning cable and iPhone port to fix intermittent charging problems
If you have an iPhone charger that connects then disconnects or starts to charge but does not charge then it can fouling which you can clean. It can be soot that gets cooked on as the charger connects and disconnects. I showed you how to clean lightning connector, using soap and water, as well as bicarbonate and white vinegar. I also stress that is only half the job; you also need to clean the iPhone port and I showed how to do that.

1 Comment
Anna
November 22, 2023Very much appreciated Jeff! I’ll be sure to properly clean my iPhone port. It has been stressing me out, so thank you!
Leave A Response