
This article shows how to use the Insert Row shortcut in Excel and how to use the Delete Row shortcut in Excel. As is typical with MS Excel, there are multiple ways to do each. First I show one quickly and then give more details and some useful tips. There are three methods which insert rows using only the keyboard shortcut, i.e. without using the mouse at all. Similarly, I show you three useful keyboard shortcuts to delete rows without a mouse. Some mouse methods are quick so I show them too. Jump straight to the quick view shortcuts at the top or read on to learn more including how to delete blank rows only.
Contents
Use the in-page link below to jump direct to the shortcut you need.
Quick view of Keyboard Shortcuts
Introduction
Insert multiple Rows Shortcut in Excel
Delete Multiple Rows Shortcut in Excel
Bonus – Delete blank rows Shortcut (without a mouse)
Maybe quicker – Delete Blank Rows with a mouse
Summary
Quick view of Keyboard Shortcuts
INSERT Row Excel Shortcut Shift+Space, Ctrl+‘+’
DELETE Row Excel Shortcut Shift+Space, Ctrl+‘-’
Insert multiple Rows Excel Shortcut Shift+Space, Shift+<down>, Ctrl+‘+’
Delete multiple Rows Excel Shortcut Shift+Space, Shift+<down>, Ctrl+‘-’
Note: For Mac computers: Just use the Command key instead of Ctrl above.
The above quick summary just gives the fastest information, but I thought you might like to see other methods and relevant tips. I explain them below.
NOTE: Did you know you can copy File Explorer Search results to Excel (as a list of file names)? Read how to here: 2 Tricks Save Explorer Search Results.
Introduction
Normally Microsoft makes simple action keyboard shortcuts easy, but the insert row keyboard shortcut is not so easy to find. You can get there using the Ribbon with a mouse, but it is not so quick when you need to do it repeatedly. Hotkeys make it easier!
If you want to insert or delete rows using the mouse see the end of each section. These primarily use a right click in the right place, or the ribbon with a mouse.
The delete rows keyboard shortcut is similarly not obvious.
The methods I’ve seen online typically require you to first use the mouse to select it.
Then they show a shortcut. To me, this is not quite as quick as using only the keyboard if that is what you want. Besides as I’ll show, there are quick ways using the mouse without the keyboard that seem better than first using the mouse then moving your hand(s) to the keyboard.
That doesn’t help when you want to record keyboard strokes for recording a macro, for example.
Read on!
Symbols Used
I’ll try to use limit the use of symbols in displaying the hotkey in most cases so it is easier to read. In some cases I might use apostrophe around the ‘key’ especially when it is a symbol rather than a letter or function key. For arrow keys and certain other keys I will use greater-than and less-than symbols around the <key>.
In between most key combinations I’ll use the plus (+) sign to indicate you hold down the first key then press the second key.
For example to hold down the Shift key then press another key, will look like this: Shift+c (which is the shortcut for copy that you may already know).
When you need to follow with a further hotkey combination, I’ll separate with a comma “,” so you can see that you don’t need to press five keys at once!
Excel Insert Row Shortcut
The Select Current Row Excel shortcut is step 1: Shift+Space
The first key combination selects the current row. This saves clicking the left of the column and makes it a shortcut without a mouse.
The Insert Row Excel shortcut to finish is step 2: Ctrl+‘+’
Note: For the Mac, use the Command button instead of Ctrl. That is Command+’+’
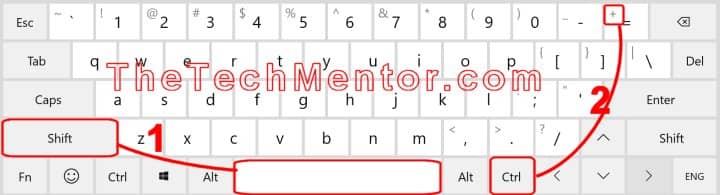
Select entire current row then insert a row using only keyboard shortcuts (no mouse). If you have a Mac, use the command key instead of Ctrl. Note: to get the + you can use only the plus key if your keyboard has a separate one (eg. on a number keypad) or if it is shared like in the image, use Shift if necessary.
Note: It can be very quick to insert rows using the mouse. Right click on the row label(s) left of the first column, then click ‘Insert Row’ in the popup menu.
NOTE 2: if you don’t select the row first, the above hotkey combination will initiate to insert the current cell only. This shows the insert dialog box and you can then select Row using further hotkeys as explained below.
An alternative way is to use the insert dialog box then ‘r’ or arrow keys and enter:
To insert a row at the selected cell, use insert: Ctrl+‘+’, r, Enter.
Or Ctrl+‘+’, then hit the down arrow twice to move selection to “Entire Row” then hit Enter.
Again, on a Mac, use Command instead of Ctrl.
Note: If you do not see the dialog box pop up, it could be because something like a table or table with a filter is blocking that command form being available. You can do it if not within the table. Your best option in that case is the first one shown above.
The quickest way using the mouse is to right click on the row label then click ‘Insert’ from the popup menu.
Insert multiple Rows Shortcut in Excel
As with everything in Excel, there are several ways you can do the action.
If you already have cells spanning several rows selected, you can just use:
The Insert Row Excel Shortcut: Ctrl and ‘+’
The same number of rows are inserted as the number of cells selected.
If not, the select current row Excel shortcut is again the first step Shift+Space
Then hit the shortcut keys Shift+<Down> to select several rows down (or Shift+<up> key to select a range of rows going up).
There is yet another way, even if you only have a single cell selected.
Again, the Select Current Row Excel shortcut is step 1: Shift+Space
Use the Insert Row Excel Shortcut: Ctrl and ‘+’
Then you can continue to hold down Ctrl and tap ‘+’ as many times as you need to keep inserting more.
Delete Row Shortcut in Excel
Assuming you have jumped straight here, the Select Current Row Excel shortcut is step 1: Shift+Space
The keyboard shortcut to delete a row in Excel is: Ctrl+ ‘-’
That is for when you already have a cell selected on the row you want to delete.
NOTE: if you don’t select the row first, the above hotkey combination will initiate to delete the current cell and other options. You can still use this dialog box as explained further below.
Note: It can be very quick to delete one row using the mouse. Right click on the row label, then click delete in the popup menu.
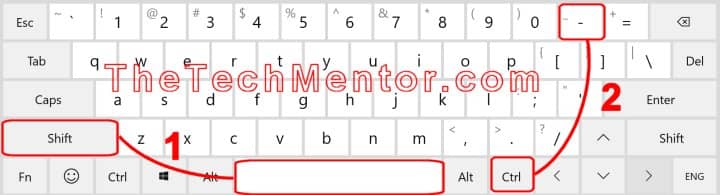
The two shortcuts to delete row in Excel. First use Shift then tap space, then Control and minus key. If you have a Mac, use the command key instead of Ctrl.
An alternative way is to use the delete dialog box then ‘r’ or arrow keys and enter:
To insert a row at the selected cell, use insert: Ctrl+‘-’, r, Enter.
Or Ctrl+‘-’, then hit the down arrow twice to move to “Entire Row” in the dialog box and then hit Enter.
Again, on a Mac, use Command instead of Ctrl.
NOTE: If no dialog box appears, look if you have a table or table with a filter in the sheet which can block that option. You can still delete a row. Your best option is the first method shown above.
The most effective way using the mouse is to right click on the row label then select Delete from the popup menu.
Delete multiple Rows Shortcut in Excel
If you already have selected cells spanning several rows, you can just use:
The Delete Rows Excel shortcut: Ctrl and ‘-’
Another way is you can just continue to hold down Ctrl and press ‘-’ as many times as you want to delete more rows.
Without the mouse move to a cell in the first row you want to remove. Type Shift+Space, which will select them all horizontally, then use the <down> arrow.
Again use Ctrl and ‘-’ to complete the process.
Using the mouse can be quick.
Select cells on multiple rows: Hold Shift and click on at least two row labels left of the first column.
You can even select with gaps if you hold down Control instead.
Right click and select ‘Delete Rows’.
Well done if you have read all the way to here, as you will have seen multiple ways and expanded your skills. TheTechMentor.com likes to give more where possible.
Bonus – Delete Blank Rows Excel Shortcut
As a bonus, I want to show how to remove blank rows in Excel.
This is something many people need but do not know it is quite EASY to do.
It can be a pain to find and select many rows before you delete them.
There is a special trick to allow you to do it without having to select every blank row manually. Without that it is not that easy using only the keyboard.
How do you delete all blank rows in Excel?
It takes a brief few steps, but you can do it using only keyboard shortcuts ie. without a mouse. Here’s how:
To select all the cells in the column of the current cell, use Ctrl+Space.
Alternatively, just select only the range you want. You can use shift and the move keys for example.
NOTE: for best results, you will want cells selected in one column only for this method, and it only works well if you have a column that is representative of your blanks.
If you really need, you could create a column that evaluates if the others are blank. If you have only numbers above zero, you could sum the other columns, for example. Another way to find blanks in a table is to add a filter (in the Home ribbon) if not already in use and choose ‘Blanks’ for each column.
First, you will need to select only the blank cells.
How do you select all the blanks cells in Excel?
To select all the blank cells in your column range, select the blank rows using the following steps:
GoTo shortcut: press <F5>.
This will trigger the Goto dialog box.
Then using only the keyboard, press Alt+Shift+s (in other words Alt+S).

Use Goto (F5) to select cells, you’ll need the Special option.
This brings up the Goto Special dialog box.
Now press k for Blanks and OK.

The Goto Special dialog box lets you select only the blanks.
Now you have all the blank cells. How do you select all the blank rows in Excel?
Now we can use the mouse or do it without the mouse. You might want to use the mouse at this point, as it has already been a few steps to now.
Next, we delete the blank rows.
Now press Alt+h for the ribbon Home menu. You’ll notice many letters appear on the ribbon.

Final steps to delete blank rows using only the keyboard. After D then press R for ‘Rows’ and you are done!
Now press D (for Delete) then R (for Rows).
DONE! Without a mouse.
Delete Blank Rows With a mouse:
With a combination of keys and mouse:
Press <F5> select Special, then click Blanks and OK.
Then click Delete in the Ribbon Home menu, and click the second option, “Delete Sheet Rows”.

The final step to delete the blank rows, shown above via the mouse. The insert shows the ribbon Home menu actions.
It’s not that hard to use only the keyboard method shown above, but you might like to just use the ribbon and mouse for the actual delete rows step. I find it easier.
Summary
I’ve shown the Insert Row shortcut and Delete Row shortcut in Excel. For each, I’ve also shown how to expand those shortcuts to insert or delete multiple rows. As a bonus, I’ve shown how to select and delete blank rows using only keyboard shortcuts.

Leave A Response