
If you let your kids use your phone and want to prevent a child from deleting texts on your iPhone, (or photos or prevent accidental phone calls) then this is how you do it. There is a system to help you but Apple hasn’t explained it well enough with key tips in detail that you need to know.
How to Prevent Child from Deleting Texts and Photos in Brief
To stop child deleting photos or texts on your iPhone, what you need to learn how to use is an inbuilt feature of the iPhone called Guided Access. This article is updated for improvements in iOS 16.
From experience, the iPhone guide does not cover enough to show you how to use it well.
In fact, it can fail to work if you miss one small detail that isn’t explained anywhere. I know this and other tips from well-over a year of using it. Read on to get the full know-how.
It’s not totally straight forward to protect your iPhone the way you might expect. But don’t be discouraged either. I will guide you right through the setup and show you many aspects of this feature with helpful tips based on my experience so you really can make it work for you easily.

This screenshot aims to show you the main steps to set up Guided Access to make your iPhone safe to hand over to your kids. Note that the detail of how to do it is important, or it might not do what you need.
Introduction
Finding out that your child deleted text messages from a contact is dramatic when they contain important messages, information or memories about special events, and photos you wanted to keep.
Prevent Child’s Play from Deleting texts On iPhone
We are talking about how to prevent a child from deleting texts in your iPhone. That is, we want to protect your iPhone from the child! NOT some kind of parental control app – for that, you might need to look elsewhere, like the App Store. One such app is OurPact. I have not reviewed it, but it has four and a half stars out of five in the App Store.
A few years ago, before I even thought it could be a problem, my daughter deleted text messages from my wife’s iPhone (from her cousin). Difficult to say exactly what was missing, but not happy!
Stop child deleting photos-iPhone
More recently, I have a friend who let their child look at photos or otherwise play with their iPhone, but their kid somehow did a factory reset, which removed all their photos (among other problems).
He was an IT manager at a company. Do you know what? He had no backup!
Many irreplaceable family photos lost! Not happy.
So backups are important.
TIP: Consider this a gentle reminder to make a backup soon!
But here’s the thing:
You can make an iPhone child safe quite easily when you know how. I’ll show you how and also point out some important tips and tricks to make it work well for you. I’ve only learned these through experience as Apple documentation about it I’ve reads doesn’t cover them. Read on.
How To Prevent child from Deleting texts on iPhone
NOTE: First, know that Guided Access is a per-app system.
In other words, you need to set it up once globally, and then set details specific in each app to which want to apply it. So you might like to block parts of the screen (where the trash can or bin is) in the text messaging app. Or you might want to block parts of the screen to stop a child deleting photos in the iPhone photos app.
There is some overall set up that is done within the Settings of your phone first.
As I show you step by step how to set it up, I’ll use some examples to help you follow the steps and learn some potential things you need to be aware of. You can do it for whichever app you like.
An advantage that Guided Access is a per-app system is that it locks the user within that specific app.
Great if you want your child to view YouTube Videos in the Safari app but prevent a child from deleting text messages, for example!
It is necessary because different apps will have different parts of the screen you don’t want kids to touch.
Step 1: Start Guided Access
Go to Settings, move down to and select Accessibility (in the list starting with General).
Move down to and tap Guided Access within the last group of options (General).
Turn on Guided Access by sliding the but to on.
Note: Guided Access keeps the iPhone in a single app. It allows you to control which features are available by blocking access to parts of the screen you define.
Step 2: Set up a Passcode
This is technically optional, but believe me, this is useful to set up.
You can also use Touch ID to control it. That’s great – when it works… but it doesn’t always!
I found that while watching videos in WhatsApp, and elsewhere, for some reason the Touch ID to end Guided Access is very slow or doesn’t always work.
I guess it relates to resource-demanding apps not allowing Touch ID to work quickly.
Go into Passcode Settings.
Tap on Set Guided Access Passcode.
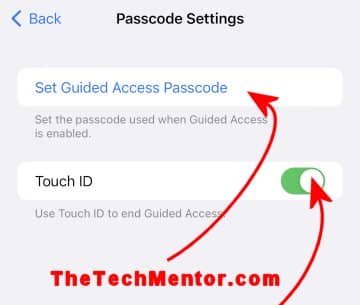
You can make sure Touch ID is turned on, but in my experience it seems difficult to exit, so I recommend also setting a pass-code.
Type a number password i.e. passcode you will remember, and that your kids don’t know.
You can use an easy code like 1, 2, 3, 4 if your kids are young and will not be able to understand nor enter a code.
Note: This pass-code will be the same for all apps because you enter it into Settings.
When you type the 4 digit code, it will ask you to re-enter it to make sure you have it right.
Then your phone will return you to the Passcode Settings screen.
Also turn on Touch ID using the slider, as this is easiest to use (if and when it works).
I’ve not needed to use Display Auto-Lock. With it you can set how long it takes your iPhone to automatically lock during a Guided Access session. If you leave it on ‘Default’ your phone will lock automatically based on the setting in ‘Display and Brightness’.
Step 4: Go to your App and Set up Guided Access in the App you want your kids to use.
Open the App.
Triple-click the side button for iPhone 14 (and with other faceID iPhones like iPhone 13 or recent iPhones back to iPhone X – with no Home button). For older iPhones, triple-click the Home button (for iPhones 8 and earlier).
This starts Guided Access. Since you haven’t yet set anything for this app, no change has taken place.
The first time your phone will still show you the the app shrunk into a slightly smaller window within it and the ‘Guided Access’ title and Cancel, Start and Options around it.
If you have set it before it will just start Guided Access. In this case, to bring up the set up options (with Resume instead of Start) just triple-click again. You will see a similar screen including to ‘End’ the session.
NOTE: You can simply block the entire screen.You can select Options, then click ff the ‘Touch’ slider button. Then no touch will work at all. I more recent change is that you can also chose to keep the volume buttons enabled.
I found that is not practical because I like the kids to be able to swipe from one item to the next. The center of the screen is good to be accessible.
Step 5: Mark on the screen when you don’t want touch screen to work.
The following is important!
First think about what you want to prevent your child from doing.
You will define what they can and can’t do based on this.
I’ll show you how to do this and the next few steps by way of a few examples.
Example 1:
In the first case I’ll show you how I set up protection for photos, so my kids can look a at our photos and videos safely.
Did you decide like me what you want them to do/not do?
This might be to slide left and right. A must would be to prevent my child from deleting photos. The button is at the bottom right hand side.
Access to the bottom right hand side needs to blocked to prevent this.
You likely want to prevent them sending to others by accident too.
So you may as well block all of the bottom of the screen.
Similarly you might decide you don’t want them to edit photos. You can also block out the top of the screen.
As you see on the bottom of the screen, it says “Circle areas on the screen you would like to disable.” It doesn’t have to be a circle or an oval.
TIP: You can draw boxes rather than circles (or ovals) and in fact, these are much better. An oval won’t cover the corners so well, and that is often where important buttons like the delete (trash bin icon) are.
Draw a rough rectangle on the (shrunk part of the) screen by dragging your finger. It doesn’t have to be perfect because you can adjust it after.
At first, you see a trace of your outline, then it transforms into a block (true circle, oval or rectangle). With shaded in-fill.
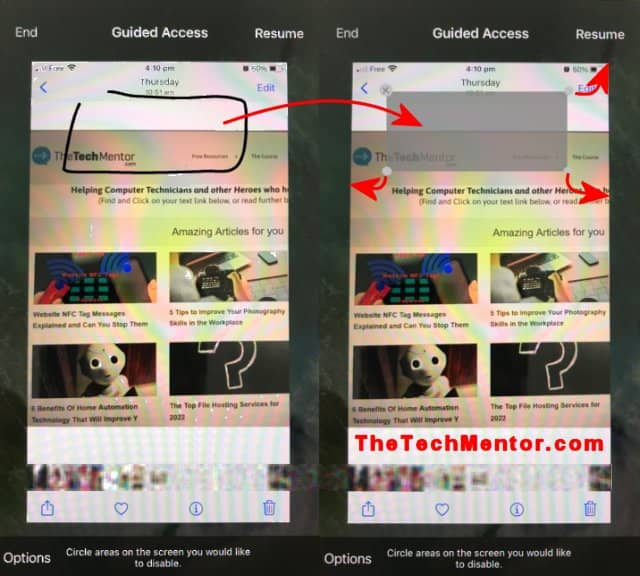
Make a rough rectangle and the software nicely turns it into a rectangle. Then stretch out the corners to block the important functions of the app. Make sure you do at least two. Include another rectangle at the bottom of the screen to prevent the delete button from being used.
If it is not right, you can delete it by tapping the ‘x’,
You can stretch or move the corners by tap-hold and dragging the corners.
Tap and drag the corners out to exactly where you need. In our case that is to all the way top bottom and both sides.
Trace with your finger to draw another rectangle at the top of the screen.
Drag the corners to fill the top of your phone’s screen.
Before you go on…
Now tap start for it to work. But then again, wait…
Important NOTE: You must set up the restricted zones in portrait view AND landscape view. Otherwise you can bypass the restrictions simply by rotating the iPhone.
No one tells you this important fact. If you or your child rotates the phone it won’t be effective unless you set it up in both orientations.
NOTE 2: Fortunately more recent changes to iOS have improved the options for Guided Access. You can now turn off ‘Motion’ using the selection slider to keep the iPhone in portrait only view. This gives an alternative to the above. That might work for you if think they might need landscape view.
So before you hit Start, rotate your phone and set up similar rectangles as zone that touch won’t work.
Now your kids can swipe left and swipe right and see all your photos safely.
Caution:
You might think that blocking the delete button works well, but there are many ways to do many things on an iPhone, and if you don’t block enough of the screen, some surprising functions might still be available.
Think child… think finger-frenzy!
For example, when looking at a single photo, you can swipe down to see many images at once (the album view). In this view you can press-hold a photo and get more options like send and Delete. Some options might show within the unrestricted areas of your phone. So be careful! You never know how many ways a child will touch and slide or experiment with your phone!
You should test a few different gestures that you might not normally try, to make sure your phone is truly safe.
Yes, your child could possibly delete a single photo and you can recover deleted photos similarly to deleted notes. But they cannot accidentally delete all photos nor exit the app and delete text messages.
Step 6: Tap Start.
A message will say “Guided Access Started” and the protected areas of the screen will have a shadow.
Perhaps you think the gray shade is not nice for viewing photos and videos, but for the purpose of showing that Guided Access is protecting those parts of the screen, allowing some touch, and protecting the rest of your phone (like text messages), it is necessary.
One option is to highlight the entire screen. No part of the screen will be operational, but there will not be such a notable shadow over part of the screen. Fine for a single long video but not good to allow swiping.
TIP: Adjust your iPhone’s volume (or screen brightness for another example) to the level you want before you make your phone secure with Guided Access. You need to do this before you start Guided Access, because you won’t be able to adjust the volume once it is started.
If you haven’t set the volume at the level you want before you set it up the first time, don’t worry. Just end the session (as described below), make the adjustment and restart (each time with a triple-click as described above).
Step 7: End when you are ready.
Triple-click the side or home button (or use Touch ID if it works).
Your will be prompted for your pass-code.
Then Tap End.
Alternatively, Resume or change the Options.
You can tap the small ‘x’ in the top right corner to delete any of the restricted shapes.
Or you can draw more restricted locations.
NOTE: This might seem a bit fiddly to set up, but the good news is you only have to set it up the first time and it will automatically be remembered for the next time you start Guided Access in that app.
TIP: If you triple -click while it is turned on, you then get the opportunity to edit your protected areas of the screen.
Step 8: Restart to stop a child from deleting text messages at Any Time
Just triple click the side or home button again in an app you have it set up for and it is ready to go with your previous settings.
Example 2
Let’s say you’re asking how to stop my child from deleting text messages on an iPhone.
I’m not sure why you will have them in the Messages App but we’ll start there, because as I noted above, Guided access is a per-App system.
NOTE: If you let your child use your phone in another app other than Messages, then set up Guided Access in that other app because it prevents exiting that app while turned on.
I’ll assume you want your child to read some messages and look at images or videos sent by someone (a relative for example).
Look on the screen for all the areas that have important functions like, edit a new message, send, reply, back to all Messages, more options. Back to all Messages (the back arrow top left of screen) is important because it is there in that view that it is quite easy to delete all messages from a contact.
These active portions of the screen you will want to block using Guided Access.
Steps 1 to 3: Turn on Guided Access in Settings, as per Steps 1 to 3 above.
I’ll assume you already read and did those.
Step 4: Make Messages From a Contact Safe from Deletion
Go into the messages from a particular contact you are happy to have your child view.
NOTE: You could set up Guided Access within the view of messages from all contacts, but be sure to note there is more functionality there.
Especially of concern is the ability to delete all messages.
If this is your need, then be sure to cover a larger portion of the bottom of the screen to prevent access to the delete button and option that can be brought up with a tap-and-hold. Try the tap and hold on a contact’s message first so you can see where those options appear.
Triple-click the home button or on the side (for iPhones X and and more recent, or on the front for older phones like the iPhones 6, 7 and 8).
Step 5: Mark on the screen when you don’t want touch screen to work.
Drag your finger on the screen to create a box at the bottom of the screen and adjust the corners by touching and dragging them out. I go into more detail in Step 4 above where I first cover it.
You want to cover any part that has functionality like entering text.
Drag your finger on the screen to create a box at the top of the screen. Again, adjust to make sure it covers the contact person or group details, the back arrow etc.
Step 6: Tap Start.
It will say “Guided Access Started” and the protected areas of the screen with have a slight grey shade.
Perhaps you think the gray shade is not nice for viewing photos and videos, but for the purpose of showing that Guided Access is protecting those parts of the screen and protecting the rest of your phone (like text messages), it is necessary.
TIP: If partial grayed-out sections bother you, you could try marking the entire screen to prevent access. That way the shadow is not obvious.
Now tap start for it to work. But then again, wait…
Important NOTE: You must set up the restricted zones in portrait view AND landscape view. These are defined separately. Otherwise you can bypass the restrictions simply by rotating the iPhone.
No one tells you this important fact. If you rotate the phone it won’t be safe any more unless you set up both orientations.
So before you hit Start, rotate your phone and set up similar rectangles as zone that touch won’t work.
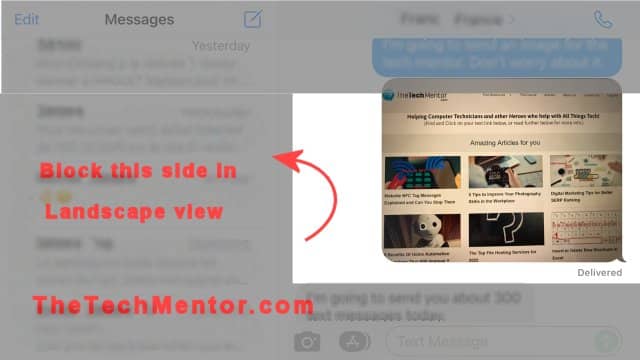
This view shows an important tip to prevent your child deleting text messages. In landscape view they can access all messages on the left and delete all texts from a contact in one go! Make sure you block that part of the screen.
Step 7: End When You Are Ready.
When I get my phone back from my child, I find it easy to end.
Triple-click the side or home button (or use Touch ID if it works).
Your will be prompted for your pass-code.
Then Tap End.
Alternatively, Resume or change the Options.
You can tap the small ‘x’ in the top right corner to delete any of the restricted shapes.
Or you can draw more restricted locations.
Step 8: Restart Guided Access to Stop Child Deleting Photos at Any Time
Now that you have it set up, you can stop child deleting photos on iPhone whenever you need.
TIP: Before you start Guided Access, note you won’t be able to adjust the volume once it is started. So make sure you adjust the volume to the level you want before you make your phone secure with Guided Access.
Just triple click the side or home button again in an app you have it set up for and it is ready to go with your previous settings.
NOTE: This might seem a bit fiddly to set up, but the good news is you only have to set it up the first time and it will automatically be remembered for the next time you start Guided Access in that app.
Example 3:
In my case I first used wanted my iPhone safe for my child in WhatsApp.
I’ll show you how I set up protection for WhatsApp, so my kids can look a WhatsApp group set up by a teacher so they can watch videos she made and sent.
I first wanted to do this so my kids don’t accidentally phone her or the whole group by mistake.
I’ll cover it in brief as you can see the detail in the previous examples above.
Go into WhatsApp
Open a conversation/chat from a particular Contact.
Triple-click the side or home button.
Drag your finger to draw a box at the top and bottom of the screen. I also draw one on each side to further limit some functionality.
TIP: I suppose you could draw a single box the entire size of the screen to prevent any gestures from working anywhere. In my case however, I want my kids to be able to tap replay.
On the positive side, if you envelope the entire screen, then the whole screen will have the shadow so it will be less likely to interfere with viewing photos and videos.
TIP: Before you start Guided Access each time, adjust the volume. This is because you won’t be able to adjust the volume once it is started. So make sure you adjust the volume to the level you want before you make your phone secure with Guided Access. If you forget, just end the session, adjust the volume, and re-start.
Thanks for reading this article on TheTechMentor.com. We aim to give you more information and learning around your subject of interest. If you know other people with an iPhone and a child, then help them by sharing with them a link to this article.
Yes, in some situations. You can use Guided Access to restrict parts of an app.
Use the iPhone built-in feature called ‘Guided Access’ to restrict parts of the screen and to lock the user within the photos app. When set up well (and there are some tricks) you can hand your iPhone to you child to flip through photos without the risk of deleted photos!

Latest Comments