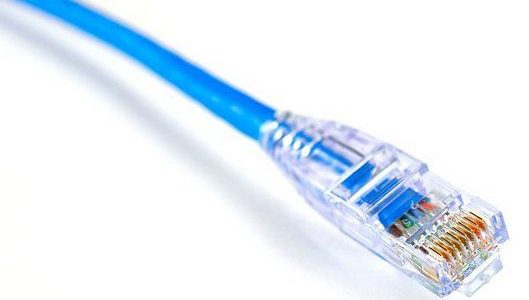
Making an Ethernet patch cable is easier than most people think, and I carry one with me all the time so you know it will be useful. Whether you want to learn to become a Computer Network Technician or just set up a network at home, I am going to share with you one of the best tutorials on how to make one by attaching the Ethernet cable plugs to your patch cable. Just get your tools and consumables and follow the steps below to create your own. If you are looking for an Ethernet crossover cable you can make one following the steps below and paying attention to the relevant notes.
The first thing you need to do is make sure you have the right tools. You can check out thetechmentor.com article that reviews complete network installation tool kits here.
If you are looking for Ethernet cable plugs and Ethernet cord etc., please see the links below.
Also for a bigger list, I have written an article that gives you all the consumables along with all the tools you’ll need as a computer repair technician (don’t worry if you never want to become a computer repair tech, but this list is gold!). It has pretty much all the consumables you will need as well as the tools I use and have found to be the best in my work.
If you are going to do a Network Tech Course (The Cisco CCNA for example) get yourself a head start by following this guide to get some practice in.
Before you get started, make sure you have the necessary tools, and decide whether you’re going to use Cat 5e or Cat 6 network cables.
Tools to Connect Your Ethernet Cable Plugs
What you’ll need:
(I mentioned above that there is another article with all the tools, but I’ll put a few of the most relevant ones below too.)
 TRENDnet RJ11/RJ45 Crimp/Cut/Strip Tool

I use these for not only making new network cables but also replacing damaged RJ45 connectors on existing cables.
This is my preferred brand of Crimp and Strip tool. If you want you can search around on Amazon to find a brand to your liking (or price for that matter!).
Network Cable Tester

This basic network cable tester is used to determine if cable is good, bad, or wired incorrectly. You will always use one or one like this, so you should just get one now.
 25ft CAT6 Patch Cable

We’re going to make one of these, but you can start off with a long CAT6 cable and make several smaller ones for practice and they will come in handy later too. I always carry a patch cable in my toolkit for obvious reasons, so it is a good idea to get a long one anyway. The longer the better especially when trying to plug in to a wall port or switch that fortune has it way of in the distance.
If you want you can just get a cheap ‘Amazon Basics’ cable:
You can find their Unshielded twisted pair (UTP) patch cable here.
You might be ready to buy in bulk to save. To do this you want to look for pull cable like the following.
1,000 ft bulk Cat5e Ethernet Cable (Wire UTP with Pull Box Cat-5e-Style Grey Cable)

Cat5e Ethernet cable
This bulk cable of 1000 ft (308 meters) is by far the cheaper way to buy it. But it might just be too big and too much so I list it last. If you are just starting out I think you could get it as there will always be applications and it will go quicker than you think.
If you look closely at the picture, you can see there is the centre hole in the wall of the box, so you can pull through as needed (great for long runs) with the clip to hold the end of the cable until next use.
Cat 5 connectors

Get a big pack of Cat 5 connectors
RJ45 Connectors
Used with my TRENDnet Crimp Tool to make new cables or repair damaged ones. Buy a big pack! You will probably use many of these. (These connectors are also called 8P8C plugs.)
RJ45 Female to Female Straight Coupler

I carry one of these around with me just in case I need to quickly make a longer cable. This one is optional for this exercise, but handy if you cut your long cable and then need to reconnect it!
Depending on what you;’re gong to be doing, you might also consider to buy the following tool now, although it is optional for now.
Fluke Network Pro3000 Toner and Probe Kit

I use the Pro3000 for toning and tracing out Ethernet wires. It’s especially handy when the cable installers don’t label any of the ports! If you are going to be installing cables – THEN LABEL THE PORTS please!
Ethernet Wiring
You may already know each Ethernet cable has are four wire pairs.
All your Ethernet connectors (8P8C) have eight pin slots. Face the clip away from you so you see just the flat side with the pins. You count (or label) the cables from left to right from 1 to 8 (duh!).
There are two standards for wiring Ethernet cables, these are T568A and T568B. T568B is the most common. and is what we’ll be using for our straight Ethernet cable.
Ethernet Cable Plug Wiring Colors
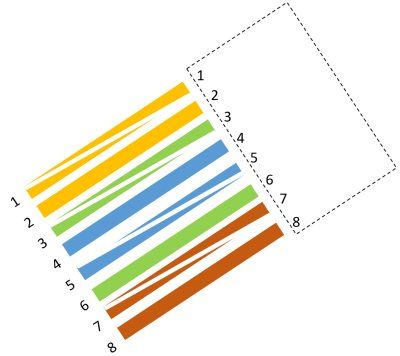
The table below show the proper Ethernet plug wiring with orientation of the colored wires to the pins for the Cat6 Cable we’ll make (ie. the more common T568B standard cable). See also the images further below within the step by step instructions.
| T568B Std. Ethernet Cable Plug Pin Number |
Cable Wire Colour |
| 1 | White-orange |
| 2 | orange |
| 3 | White-green |
| 4 | blue |
| 5 | White-blue |
| 6 | green |
| 7 | White-Brown |
| 8 | Brown |
Just for completeness I’ll list out the cable colour order for the other Ethernet cable plug standard (T568A).
Ethernet RJ45 Crossover Cable Wiring
NOTE: Of course if you want to make a cross over cable, then you can make the cable wiring to the different standard alignments at each plug (ie. one end will have the T568B and the other the T568A). There is also a diagram of this showing the wires in color further below.
| T568A Std. Ethernet Cable Plug Pin Number |
Cable Wire Colour |
| 1 | White-green |
| 2 | Green |
| 3 | White-Orange |
| 4 | Blue |
| 5 | White-blue |
| 6 | Orange |
| 7 | White-brown |
| 8 | Brown |
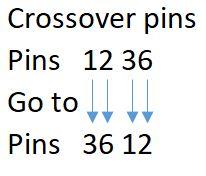
In RJ45 crossover cable wiring, you can remember which cables are switched by remembering 12 36 to 36 12 (twelve thirty-six to thirty-six twelve) for the Ethernet cable plug pin numbering above. This gives you the relevant switch of T568A to B (and vice versa). That means 1 goes to 3, 2 goes to 6; 3 goes to 1 and 6 goes to 2.
It is simple to remember because it makes it seem like just 2 pairs of numbers then reversed.
Ethernet crossover wiring pin order, no matter whether you start with T568A or T568B!
Okay, now on with the method.
How to make an Ethernet Patch Cable Like a Pro!
Follow the step by step instructions below.
Step 1: Cut and Strip
(The cable not you!) Cut and strip the cable jacket about one and a half inches to the end. As I stated above I own the TRENDNet cut and strip tool, but obviously use the one of your own preference.
Step 2: Spread the Ethernet Cable Wires
Spread the four wires apart. For Cat 5e, you can use the pull string to strip the jacket farther down if you need to, then cut the pull string. As you may know, you need to cut out the spine from a Cat 6 cables before inserting into the Ethernet cable plug.
Step 3: Untwist the Wire Pairs
Untwist the wire pairs and neatly align them in your chosen orientation based on the tables above (ie. for T568B or T568A) and image below (T568B).
NOTE: Do not untwist them down the cable than where the jacket begins; you should to leave as much of the cable twisted as possible.
Step 4: Cut Again (Evenly)
Cut the wires as straight as possible, about half an inch from the end of the jacket. This is important as you want them all to sit evenly inside the cable plug. If you want to, you can hold it against the boot and mark with a permanent ink pen first.
Step 5: Insert Wires Into the Ethernet Cable Plug
Carefully insert the wires all the way into the modular connector, making sure that each wire passes through the appropriate guides inside the connector.
Step 6: Crimp It!
Push the connector inside the crimping tool and squeeze the crimper all the way down.
Repeat for the other Ethernet cable plug
Repeat the above steps to attach another plug to the other end of the cable.
As I wrote above, you can make an Ethernet crossover cable by making the other end as a T568A, as per the image below.
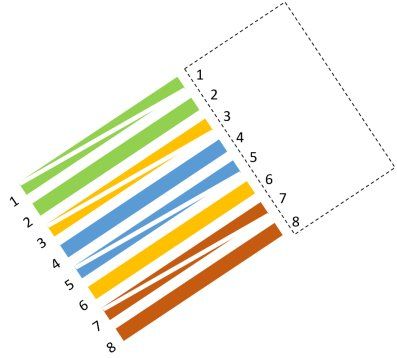
T568A Ethernet plug wiring
Ideally, to make sure you’ve properly terminated each end of the cable, use a cable tester like the one shown above to test each pin. This is when you will know if you cut your wire pairs evenly enough!
To make an Ethernet Crossover cable, your cable pugs would be terminated like so:

Ethernet crossover cable end boots. Can you see the 12 36 to 36 12 pattern?
If that’s not enough explanation of how to make your own Ethernet crossover cable:
I am going to share with you one of the best tutorials that I have ever found on how to create one. Just follow the steps in this video below by ViewDo to create your own (I love that name, just like Voodoo!).
Are you new to Making Cables and Installing Networks?
If you are reading this then likely so! You would be well advised to check out Mike Meyers book on the CompTIA network plus book below (We have recommended Mike Meyers books before, but of course you could check out a few and get another CompTIA network plus book if you prefer).
It’s very handy and as typical the CompTIA study course covers a lot of the basic knowledge or foundational knowledge that you need. I know you may not intend to do exams and become a certified computer network technician. However, this book does provide worthwhile knowledge before you start cutting and crimping.
For beginners, it is a book covering the basics and really is an essential network technician’s tool regardless of whether or not you intend to actually sit the CompTIA test.

Mike Meyers’ CompTIA Network+ book is a great way to leapfrog your computer networking knowledge. If your are learning it belongs in your tool kit! Click the cover image to check it out on Amazon.
Summary of how to make an Ethernet Patch or Crossover Cable
You’ll need to get the tools and follow the step by step instructions above. We show you how you connect each Ethernet cable plug with the correct plug wiring order to make up your Ethernet patch cable (or RJ45 crossover cable).

1 Comment
Daniel
August 6, 2007I have to say, that I could not agree with you in 100% regarding this, but it’s just my opinion, which could be wrong 🙂
Leave A Response